Showing posts with label China Glaze. Show all posts

Tuesday, July 3, 2012

Kyoti's Nails LGBT Pride/Support Nail Art Contest


So, my first ever nail art contest entry! This contest was held by my good online lacquerista friend and blogger, Jessica of Kyoti's Nails. Click to check out her blog! Also, here is the post announcing the winners of the contest.

I am a straight ally of LGBT rights, and was honored to  participate in this contest to show my support. Submission below. And as always, you can click to enlarge the picture.
Topcoat, Natural Light
I loved wearing this one and I kept it on for a good week, only taking it off last night because it was just getting too worn and chipped. It was great because I had all sorts of people commenting and asking about it, so I got to explain its significance as June is LGBT Pride month. Solidarity!

I painted each finger the base color and used the Spun Sugar technique (I'll link a tutorial to the end of this post). This was my first time trying this technique and it was surprisingly painless, if a little time consuming (I'm impatient!). All you need is a toothpick and a plastic-type of surface (not paper). You then proceed to wrap or "spin" tacky little strands of polish around your nails. And voila!

This mani is wonderfully textured without a topcoat (example below), but I needed to take a shower and no way was I going to let things get smudged or ruined. It was night time, so all I have are indoor photos.

No topcoat, Indoors
I was experimenting with objects to hold and pose with. Sneaky Snake is the best snake.


Whee, texture! Though my thumb is an example of what to try and avoid. I think I kept accidentally touching my toothpick to the nail during the spinning process. But the rest of them came out quite nicely; not bad for trying something new. :)

Rich and Famous by China Glaze
And here's what I went with for my off/right hand, because it's summer and I love this color and it looked pretty fab paired with rainbow nails, not gonna lie. Sorry about my middle and index finger being slightly goofed. This was rather hastily applied when I was quite tired, but I knew I had to get this color on and get the topcoat drying for at least 30 minutes before I could shower and crash into bed. Anyway, it cleaned itself up after a day or two of wear. Oh, and this is only two coats, did I mention how much I love this color?


Colors used:
Left hand
CG's Coconut Kiss (purple)
Zoya's Sooki (red)
OPI's In My Back Pocket (orange)
Sally Hansen's Mellow Yellow
CG's Entourage (green)
SC's Savage (blue)


Right hand
CG's Rich and Famous

And as promised, the tutorial for this technique. To be honest, this isn't the best video I've seen for this type of nail art. I first heard about this from blogger SimpleLittlePleasures (she has gorgeous stuff!) and I loved her tutorial, but I could not find it through Google or Youtube! =( But the following tutorial will give you a good idea of what to do if anyone wants to try it for themselves.

Friday, June 29, 2012

Week 36 - Summer

To me, Summer means bright colors, crazy-fun patterns, and Summer Sales!! So when I heard that Anthropologie was having a summer sale, heck yes, I was there. I needed something quick and easy to go with my favorite of the three blouses (see below) that I ended up with from the sale.

These photos kept wanting to come out looking like MySpace boob shots.
Nope, we keep things classy up in this blog.
At first I tried to do a sort of abstract flower bed of purple and orange petals (think daisies), but it was not coming to life in any recognizable shape, form, or fashion, so took that off and started over.

Since it was late and I had a big morning ahead of me, I decided to keep it cute and simple and went with some randomly placed double-dotting.

Index finger chip made me so sad.

I ended up being pretty happy with this! It was also very easy and straightforward to do. I just painted a base color of For Audrey and then went to town dotting in random places with a medium-sized dotting tool and some purple and orange polish. Then I went back with white polish and dotted white in the center of each dot. Topcoat and done! Just make sure that everything is dry when you go for the topcoat, otherwise you run the risk of smudging your design.
And voila!

So this was actually my off-/right-hand. My left hand was sportin' the sushi design I wrote about below. To end this post, here's a picture of me at Akon posing with some Henchmen from one of my all-time favorite shows, The Venture Bros.! These guys did an awesome job, major props.

R.I.P. #42


Colors used:
CG's For Audrey
CG's White on White
Zoya's Tru
OPI's In My Back Pocket 

Tuesday, June 5, 2012

Week 35 - Inspired by Food

So two things:
1) I trimmed my nails completely a few days ago because a some fingers were getting thin, bendy, and/or peely. Also, it was getting troublesome to type on my keyboard at work, so off with their heads!
2) I finally got a hold of some cuticle oil/butter from Lush and some proper Biotin vitamins. More about this in a post to follow.
3) I've been waiting so long for this theme and sushi nails had to happen!

Super adorbz.
I love how these came out and they were a lot of fun to actually do. The wasabi and the thumb roll are my favorites. Also, lol @ scandalous tuna sushi's "come hither" expression. I did follow this excellent tutorial by Miss Rainyday pretty closely, which can be found here!
The jist of things is to paint your thumb nail the dark color, your index, middle, and ring fingers white, and then your pinky finger green. The fish pieces themselves are pretty straight forward. The dotting for the eyes and the eye lashes were actually the most challenging part of this mani because you had to be really precise with your placement, application of pressure, and how much polish is actually on the brush (don't want to glob it all on there). 


Again, this has been really fun to wear and its gotten me compliments from friends and strangers alike! 

Look at my white polish, all battle-hardened. It's seen some action, man, and it doesn't want to talk about it.

Dotting tool
Angled thin brush (needs to be cleaned but eh)
CG's Glittering Garland
CG's Entourage
Essie's muchi, muchi
SC's Let's Meet
Orly's Peachy Parrot
Zoya's Kelly
CG's Red Pearl
CG's White on White

Monday, June 4, 2012

Week 33 - Orange

This week's theme was an excuse to do an other My Little Pony inspired manicure! Of course I went with Applejack.

Aaand this is what I came up with:


Her freckles made me want to do polka dots! I tried doing the darker orange as the base with the lighter orange as the polka dots, but it just didn't look right so I took it off. One thing I dont' care for though - I did a coat of Shine of the Times over the pointer, index, and pinky fingers to try and spice things up. I don't think it really added anything to the manicure though, and if anything, made it look less smooth and uniform. Also, the middle finger got a bit goofed... I think due to shrinkage caused by Seche Vite, as it may not have been quite dry enough when I applied the top coat... or maybe I bumped something, who knows! 

This was also the first time I tried the "make your own nail stickers" technique. I did this for the apples and the bow. For those not familiar, what you do is take a ziploc plastic bag and draw your design (in my case, apples and a bow) in polish onto a side of the baggie. Let it dry completely. Then peel off your design (it comes off easily) and place onto a tacky-wet base color with tweezers. And voila!


Since it was orange week, I went ahead and did a solid application of the darker orange I had used for dotting. It was pretty pretty on its own! Excuse the tip wear, it had been a few days and it really did hold up well overall. 


All in all, I was pleasantly surprised by Sinful Colors. I had made an emergency run to Target for this mani and couldn't spend much. At $2 a pop, SC has been a little hit-or-miss for me in the past, but these two oranges worked out quite nicely.


Orly's Lucky Duck
CG's Red Pearl
Sinful Colors' Cloud 9  (orange)
Sinful Colors' Let's Meet  (light orange)
Essie's Shine of the Times


Thursday, May 17, 2012

Week 32 - Flowers

Flowers! So many possibilities for this challenge... it was a bit overwhelming. I went through three other design ideas before I settled on cherry blossom nails (since I was going to sushi later that day). I had wanted to try something new, but was fine revisiting this design using all-different colors from my previous mani.


I started with my pinky and worked my way left.


My thumb came out as my favorite. :)


And here is what I used for painting, dotting, and clean-up. The two Essie's are new and I really liked them. I've had the China Glaze for a little while but have never used it before now... and Elsbeth's Rose is an old favorite - it is so easy to stamp, dot, and generally work with.

Essie's Muchi, Muchi (light pink)
Essie's Mink Muffs (brown)
CG's Re-fresh Mint
Orly's Elsbeth's Rose

Tuesday, May 8, 2012

Week 31 - Neon

Okay, posting this quickly because I'm at work. First off, please excuse the state of my cuticles! They've been impossible to keep moisturized in the first place and yesterday I had to wash my hands several times with some harsh soaps while going through things at work. I really need to figure out where a local Lush store is for me and pick up their cuticle cream that I hear only good things about!


I did these Saturday night and just got around to the chevron taping last night at about 2am, so these pictures are in the early morning of Day 3 for this mani. That considered, these held up quite nicely! Shown here is my right hand... I tried a color experiment with a pink and blue retro-looking accent nail on my other hand and didn't like how it came out. So, because I rarely photograph my right hand, I'm usually 10% less careful about coloring within the lines, so to speak, and also it was late at night.

The orange glitter shown here is China Glaze's Riveting and the bright orange neon is China Glaze's Japanese Koi. Neons are notoriously sheer, so what you see is probably 4 or 5 coats. Also, surprise surprise - Japanese Koi dries matte! I did not notice this before as it is only my second time using this color and first time using it all on its own. :)  But here it is made glossy with a coat of Seche Vite.

This is also my first time using Riveting all on its own and w-o-w, it is freaking gorgeous and I love it to pieces. Okay, so maybe this week's mani was an excuse to try-out and showcase Riveting rather than ACTUAL neons... I know I've enjoyed wearing bright orange on my nails these past few days.

Riveting by China Glaze
Japanese Koi (Neon) by China Glaze

Saturday, April 14, 2012

Week 29 - Inspired by Fashion

So I needed a cute themed manicure that would still go with a dress I wanted to wear to my friend's wedding today (Congrats Emily!!). I didn't really want to match it to my dress because I didn't feel like doing a black and white floral pattern with bright pink to match my cardigan, PLUS having to take a picture of me in it.  Basically, I knew I wanted a cute black and white funky french, polka dots, and little red bows and it was just a matter of finding something cute and fashion-y to base my vision off of!  

CG's White on White
SOPI's What's A Tire Iron? 

Zoya's Sooki

So, while this was inspired by this shoe, it was done with appropriateness to the special occasion in mind. It still went really nicely with my dress! I just did a straight-up solid application of the bright red I used for the bows (Zoya's Sooki) on my other hand but couldn't get a very good photograph before the weather turned bad. Here's the link to a quick review post because hey, solid color application clearly counts as a swatch, even if it isn't documented at each coat. 

Back to the my left hand (the one based off the shoe): While I worked darn hard on on the clean-up, my thumb's cuticle line was so stubborn (even after a hot shower). Also, my cuticles insist on being kind of dry here and there despite constant application of this cuticle oil I got from Sephora (by OPI) about a month ago. I've almost gone through the whole thing (with generous application): 


While the reviews on the cite are largely positive (and it does smell great), it only sort of works for me. I think my thumbs just refuse to hydrate no matter what I do (this cuticle oil + VS hand lotion + prenatal vitamins), so I guess I'm in the market for some kind of crazy hardcore cuticle moisturizer.

Also worth mentioning: Blue Cross Cuticle Remover is amazing and I do notice a difference between that and this OPI cuticle oil in most of my nails... but big guns are still needed from somewhere for my needy, stubborn cuticles. :(


Tuesday, April 10, 2012

Week 28 - Yellow

I had a few ideas for this week's Yellow theme (bumblebees were on the table but I'd want proper striping tape for that). I settled on doing something simple, easy, and pretty. I was originally thinking - Orly's Hook Up as the yellow base complemented with some of gold stamped pattern using my new bottle of Orly's Luxe. I'd seen lots of really good turn-outs with Luxe for stamping, and I was all gung-ho to try my hand at it. I mean, how hard can it be to paint your nails yellow, and then stamp a little sun or something cute and call it a day? Oh no. Oh ho ho no. Scroll down to the end of this post for a rant about Hook Up.

What I have on for this week's challenge is Champagne Bubbles by China Glaze from their Winter Holiday 2011 collection!
 
This polish is so pretty and has even gotten me several compliments from random strangers! As you can see, it's a very yellow-gold metallic base with a generous speckling of very fine, square, silver glitter (the bubbles!). It applies and dries smoothly. Here, I am wearing two coats.

Here are some other pictures to give you a good idea of the glitter distribution. (Click to expand)


 As you can see, the glitter-ing is quite subtle, but very much there. This is my first time wearing this polish all on its own and I really dig it.

Rant below:
So like I said, straightforward yellow base + some gold stamping/accenting. Should only take an hour tops, what could go wrong?? Three and a half frustrating hours later, I took it all off and admitted defeat. This was 90% the fault of Hook Up, which was so delicate (and pearly-streaky) that if you so much as looked at it wrong, it would crinkle or smudge and you'd have to start all over. Also, I couldn't get Luxe to transfer successfully, but I chalk this up to me needing more practice rather any fault with the polish. This would be all well and good - I'm patient enough for multiple stamping attempts to get something right - but Hook Up would not cooperate.

General rule of thumb for stamping attempts: with a coat of Seche Vite over the base color, you can remove up to two botched stamping attempts with non-acetone remover and a q-tip; you can do this without affecting the base color (because you're just removing the layer of top coat, not the color beneath it). After two removals, just apply a new layer of Seche Vite to dry, and you're good to go for two more attempts.

But no, during my second (gentle) q-tip rubbing with non-acetone, I ended up smearing the yellow polish base coat pretty significantly. Sigh. Take off, reapply, rinse and repeat until I got fed up enough and just took it all off.

And just to add insult to injury? For the measly ~3+ hours it was on my left hand, bam, stained yellow. First world lacquerista problems, man.

Since my nails were now stained, I couldn't NOT go without some sort of polish on my talons, so I decided to try my bottle of Fast Track from the Hunger Games collection and, of course, it applied beautifully and looked awesome. I didn't take pictures because in my lacqueraaaage I had scrubbed Hook Up into my cuticles and nail bed, and even my post-manicure shower didn't remove it all. : / So, pretty color to swatch (Fast Track), but it looked as if I had just finished peeling an orange or something.

So I am now in the market for a new go-to yellow, preferably a cream...

Sunday, April 1, 2012

Week 27 - Easter


In the shade

In the sun

Conversation between my husband and I:
"Man, I don't know what I'm supposed to do for Easter nails. I don't celebrate it, I hate pastels, and I won't force myself into drawing eggs and/or bunnies."
"Hm ... So do zombie nails?"
"... but of course!"

...And that is all I will say about this week's theme. Although I do think its kind of weird that it's this week and not next week, seeing as Easter Sunday is April 8th.


From left to right:
Orly's Here Comes Trouble
Essie's Sew Psyched
Essie's A Cut Above the Rest
CG's Glittering Garland
CG's Red Pearl
I started with two coats of Sew Psyched and added one light coat of the green Orly glitter, Here Comes Trouble. For the red splatter: I took a straw, dipped it into Red Pearl's polish well, aimed it over the nail and PUFFED. For the zombie ichor, I took a toothpick dipped in Glittering Garland and pressed it/dripped it randomly here and there. I didn't want to risk overwhelming the blood splatters.

For the brain gore-chunks, I brushed a random streak of pink glitter, A Cut Above, and set a light-pink rhinestone (brainssss) some where in the glitter trail.

In-doors, pre-clean up

This PC picture was taken with my hubby's iPhone (because I'd left my camera's SD card at work). I think it really adds to the effect!  You can see the crazy red splatter, and my initial attempts at doing dark green splatter before I realized I'd rather do it manually.

Week 26 - Pastel

CG's Sea Spray
Zoya's Trixie
So with Easter just around the corner, and me not being a big fan of pastel colors in the first place, I decided to take some inspiration from the recent Dallas weather.

First attempt doing a cloud manicure - came out looking pretty darn good if I say so myself!

First time using Trixie since I got it and I have to say, I am in love. It far exceeded my expectations in the context of this manicure (stormy clouds, overcast skies). 

It goes on beautifully but is rather unforgiving when it comes to nicks and dents. But still, it perfectly fills the role of foil-finish silver for my collection.

Second time using Sea Spray, but first time using it as solid color. Opaque in two coats, applies smoothly and evenly, Sea Spray is another quality example of why China Glaze is one of my favorite brands.

Week 23 - Spring (March 6, 2012)

Zoya's Bevin
Zoya's Cho
Essie's Little Brown Dress
CG's White on White
My take on a cherry blossom tree manicure. Mostly because I wanted an excuse to use Zoya's Bevin and Cho together - this manicure idea was half the reason I bought them. <3

Ignore the rain drops!

Background teal-blue- Zoya's Bevin
Branches- Essie's Little Brown Dress
Blossom petals- Zoya's Cho
Blossom center- China Glaze's White on White

Week 22 - Inspired by a Flag (February 27, 2012)


British Columbia has the weirdest flag, I dont even know. But I did have fun!This was all free-handed. Got to use my nail art brushes all legit-like to make the union jack and first time doing french tips with regular scotch tape (they turned out pretty okay).

Oh, and if you think my ring-finger sun looks a little wonky, just take a closer look at the flag... I was just trying to be true to the source material - *cough cough*.

Blue - Essie's Aruba Blue
Red - China Glaze's Red Pearl
White - China Glaze's White on White
Yellow - Orly's Hook Up


Week 21 - Green (February 20, 2012)

I love this green so hard. Its easier to see in the bottle and the sun, but its actually a green/golden-yellow duochrome! I didn't want to cover up the color too much so I decided to compliment the yellow with a gold glitter gradient on two accent nails to dress it up.

CG's Cha Cha Cha
CG's Blonde Bombshell
I love this color but it did end up staining my nails yellow (as I've found all greens will do to me). I should probably invest in a different base coat at some point, but oh well. This color is so gorgeous on it's own. So lively and lovely to look at.

Wednesday, March 14, 2012

Week 20 - Valentines Day (February 13, 2012) and Review of CG's "Go Go Pink"


Second time dotting, first time stamping. My Hot Chocolate polka dots are supposed to bring to mind a box of chocolate, and for the record, it is THE PERFECT milk chocolate color. My first time using this color and I am so pleased.

And let the records show that Elsbeth's Rose transfers beautifully as a stamping polish. My first stamping success!

Review for China Glaze's
Go Go Pink.

Color Family: Pink
Color Finish: Cream


First time using this beautiful pale cream pink that I got from a swap. When the bottle arrived, I was initially annoyed that a fair amount had been used up already (while the bottle I traded was completely brand new; an accidental extra).
But it all made sense once I sat down to use it.

Application was a pain. It took at least five coats on each finger to get this level of opacity, something that really surprised me from China Glaze as their formulas are usually opaque in three coats or less, easy. In addition to being sheer, it was stubbornly streaky and took forever to dry between coats.

Once you get past the application, the color itself is gorgeous. I'm not sure if its from all the coats I used to reach opacity, but it ended up feeling delightfully squishy, as if gel.

Over all, I would give this color a 3.5 out of 5.0. While the end result is arguably worth it - you'd never guess it was such a pain in the butt to work with - I'm sure there are plenty of other pale pink creams out there with much easier application. I don't want to end up using 1/4 of the bottle every time I feel like a light pink manicure.

Application: 2 of 5

Color Intensity (Initial): 2 of 5
Color Intensity (Final): 5 of 5
Color Tone: Cool

Additional Comments: Streaky, Inefficient, Sheer, but you'd never know if all you saw was the final result.

Overall Score: 3 of 5

Week 19 - Polka Dot (February 6, 2012)

CG's For Audrey
CG's White on White

First time dotting, with bonus kitty picture!


I've been dying to use For Audrey for a Tiffany's inspired manicure since I bought it. It's a perfect match to the Tiffany's box, if you can't tell by the photos. A very popular and well-known color, For Audrey is a laquerista litmus test, and should be recognized on site! A must-have in anyone's collection! ;)

Week 18 - Inspired by a Movie or TV show

Sorry for the condensed format! I initially threw this together to make posting it on Facebook easier and in one piece.
Direct link to a bigger and better quality picture here: http://i.imgur.com/fxvOv.jpg

Farscape nails! Since its sort of niche, I thought I'd provide a brief (and informative) collage so that you'd know what's what.

Farscape aired from March 1999 to Oct 2004. I remember watching it every Friday night with my dad, so there a lot of good memories tied to this show. Bought the whole series and am making Jacob watch it with me! As of painting this, we're on season 1 and almost on season 2. There were a few other characters I wanted to include (namely, John Crichton, the main character) but alas, not enough fingers on my left hand...

Peacekeeper thumb
China Glaze's White on White
OPI's What's a Tire Jack?
China Glaze's Red Pearl

Zhaan index
Base is Orly's Sweet Peacock
Sides - Nina Ultra Pro's Big Spender

Very light overall application of China Glaze's Blonde Bombshell

D'argo middle
Base is Orly's Act Your Shoe Size
Tattooing is Zoya's Kelly

Rygel ring
Base is Zoya's Jem
Green is OPI's Leaf Him At The Altar
Gold is Nina Ultra Pro's Big Spender

Chiana pinky
Base is China Glaze's Sea Spray
Sponging light silver is China Glaze's Platinum Silver
Sponging dark silver is Zoya's Freja

Right hand - Moya
Orly's Fowl Play

with Essie's Shine of the Times on the ring finger only

Week 17 - Red (January 23, 2012)

So this week's theme is Red, but all I really wanted to do was find some way to try my new bottle of Champagne Bubbles. I had some neat taping ideas that ended up looking weird in practice, so after an hour or two I said "screw it" and just did a simple red mani with Champagne Bubbles as the accent finger. I dressed it up a little with some nail stickers. I do really like this red (Star Spangled), the micro-glitter is really dynamic. The picture doesn't do it much justice; it reminds me of Dorothy's ruby slippers.


Champagne Bubbles is lovely too! You can't see it in this picture, but its a shimmery golden-yellow with tiny, sparse silver microglitter - aka, the bubbles!


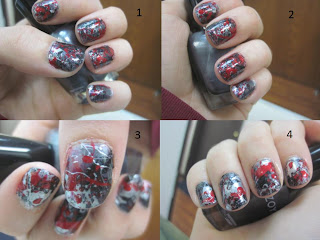
Week 16 - Splatter Nails (January 16, 2012)

1 & 2 is my left hand
3 & 4 is my right hand
Zoya's FrejaCG's Red PearlCG's Platinum SilverSC's Secret Admirer
This was a lot of fun but super messy! I got so many compliments when I wore this with a cute, dark grey sweater-dress. At least three people said my nails reminded them of Jackson Pollock!  

There are a couple of ways to do splatter nails, and  I chose the straw technique. Messy, but in my opinion, the most effective and cool looking! Clean-up was a major pain as there was polish everywhere, and not flooding your cuticles is pretty impossible with this technique, so go hog .

I did two coats of Freja, a gorgeous shimmery steel-grey, as the base color. For the splatter, I took three straws - one for each color - and dipped it a good half-inch into the polish well (you kind of have to guesstimate since you can rarely see into the bottle from the sides). Then you lift it out, letting any super-excess drip off, position it over your nail, and puff hard through the straw! It can be hit or miss sometimes. The main thing you want to avoid is just globbing a drop on your nail instead of splattering. Short, quick, hard puffs through the straw are the best way to go. And if you still end up globbing here and there, just roll with it. :) It'll all get smoothed out with the top coat, and no matter the outcome, it's art!


Week 12 - Christmas (December 19, 2011)

Too many colors to name them all.

This one was pretty cute to wear! Lots of colors, lots of fun. Also first time using Orly's Sweet Peacock (pinky) and Fowl Play (ornaments, ring finger), which I got from a swap.

All went well, except the green I used on my middle finger ended up staining my nail yellow. :[ It was also really really thin and would smudge/wrinkle if you even looked at it wrong. I lost count of how many times I had to completely redo it. That green turned me of off Sinful Colors for awhile, but I've since learned that any green, regardless of brand, will stain my nails in spite of a base coat present.Will post the name when I get home and can look it up.

Week 11 - Violet (December 12, 2011)

Inspiration: My Little Pony's Twilight Sparkle! ♥♥
CG's Coconut Kiss
SC's Bali MistOrly's Elsbeth's RoseCG's Platinum Silver

I've been waiting soo long to do a MLP-inspired manicure, and this week's Violet theme provided the perfect excuse.


I did two coats of Coconut Kiss on each finger. Then I did a centered taping of Bali Mist, which is really sheer on its own and looks lovely over the dark purple. I then applied two coats of Bali Mist over my ring finger and free-handed the cutie mark with a brush and Elsbeth's Rose. I then used a striping tool for the Platinum Silver on each finger. 


Ponies are so boss.