Showing posts with label Sinful Colors. Show all posts

Tuesday, July 3, 2012

Kyoti's Nails LGBT Pride/Support Nail Art Contest


So, my first ever nail art contest entry! This contest was held by my good online lacquerista friend and blogger, Jessica of Kyoti's Nails. Click to check out her blog! Also, here is the post announcing the winners of the contest.

I am a straight ally of LGBT rights, and was honored to  participate in this contest to show my support. Submission below. And as always, you can click to enlarge the picture.
Topcoat, Natural Light
I loved wearing this one and I kept it on for a good week, only taking it off last night because it was just getting too worn and chipped. It was great because I had all sorts of people commenting and asking about it, so I got to explain its significance as June is LGBT Pride month. Solidarity!

I painted each finger the base color and used the Spun Sugar technique (I'll link a tutorial to the end of this post). This was my first time trying this technique and it was surprisingly painless, if a little time consuming (I'm impatient!). All you need is a toothpick and a plastic-type of surface (not paper). You then proceed to wrap or "spin" tacky little strands of polish around your nails. And voila!

This mani is wonderfully textured without a topcoat (example below), but I needed to take a shower and no way was I going to let things get smudged or ruined. It was night time, so all I have are indoor photos.

No topcoat, Indoors
I was experimenting with objects to hold and pose with. Sneaky Snake is the best snake.


Whee, texture! Though my thumb is an example of what to try and avoid. I think I kept accidentally touching my toothpick to the nail during the spinning process. But the rest of them came out quite nicely; not bad for trying something new. :)

Rich and Famous by China Glaze
And here's what I went with for my off/right hand, because it's summer and I love this color and it looked pretty fab paired with rainbow nails, not gonna lie. Sorry about my middle and index finger being slightly goofed. This was rather hastily applied when I was quite tired, but I knew I had to get this color on and get the topcoat drying for at least 30 minutes before I could shower and crash into bed. Anyway, it cleaned itself up after a day or two of wear. Oh, and this is only two coats, did I mention how much I love this color?


Colors used:
Left hand
CG's Coconut Kiss (purple)
Zoya's Sooki (red)
OPI's In My Back Pocket (orange)
Sally Hansen's Mellow Yellow
CG's Entourage (green)
SC's Savage (blue)


Right hand
CG's Rich and Famous

And as promised, the tutorial for this technique. To be honest, this isn't the best video I've seen for this type of nail art. I first heard about this from blogger SimpleLittlePleasures (she has gorgeous stuff!) and I loved her tutorial, but I could not find it through Google or Youtube! =( But the following tutorial will give you a good idea of what to do if anyone wants to try it for themselves.

Tuesday, June 5, 2012

Week 35 - Inspired by Food

So two things:
1) I trimmed my nails completely a few days ago because a some fingers were getting thin, bendy, and/or peely. Also, it was getting troublesome to type on my keyboard at work, so off with their heads!
2) I finally got a hold of some cuticle oil/butter from Lush and some proper Biotin vitamins. More about this in a post to follow.
3) I've been waiting so long for this theme and sushi nails had to happen!

Super adorbz.
I love how these came out and they were a lot of fun to actually do. The wasabi and the thumb roll are my favorites. Also, lol @ scandalous tuna sushi's "come hither" expression. I did follow this excellent tutorial by Miss Rainyday pretty closely, which can be found here!

The jist of things is to paint your thumb nail the dark color, your index, middle, and ring fingers white, and then your pinky finger green. The fish pieces themselves are pretty straight forward. The dotting for the eyes and the eye lashes were actually the most challenging part of this mani because you had to be really precise with your placement, application of pressure, and how much polish is actually on the brush (don't want to glob it all on there). 


Again, this has been really fun to wear and its gotten me compliments from friends and strangers alike! 

Look at my white polish, all battle-hardened. It's seen some action, man, and it doesn't want to talk about it.

Dotting tool
Angled thin brush (needs to be cleaned but eh)
CG's Glittering Garland
CG's Entourage
Essie's muchi, muchi
SC's Let's Meet
Orly's Peachy Parrot
Zoya's Kelly
CG's Red Pearl
CG's White on White

Monday, June 4, 2012

Week 33 - Orange

This week's theme was an excuse to do an other My Little Pony inspired manicure! Of course I went with Applejack.

Aaand this is what I came up with:


Her freckles made me want to do polka dots! I tried doing the darker orange as the base with the lighter orange as the polka dots, but it just didn't look right so I took it off. One thing I dont' care for though - I did a coat of Shine of the Times over the pointer, index, and pinky fingers to try and spice things up. I don't think it really added anything to the manicure though, and if anything, made it look less smooth and uniform. Also, the middle finger got a bit goofed... I think due to shrinkage caused by Seche Vite, as it may not have been quite dry enough when I applied the top coat... or maybe I bumped something, who knows! 

This was also the first time I tried the "make your own nail stickers" technique. I did this for the apples and the bow. For those not familiar, what you do is take a ziploc plastic bag and draw your design (in my case, apples and a bow) in polish onto a side of the baggie. Let it dry completely. Then peel off your design (it comes off easily) and place onto a tacky-wet base color with tweezers. And voila!


Since it was orange week, I went ahead and did a solid application of the darker orange I had used for dotting. It was pretty pretty on its own! Excuse the tip wear, it had been a few days and it really did hold up well overall. 


All in all, I was pleasantly surprised by Sinful Colors. I had made an emergency run to Target for this mani and couldn't spend much. At $2 a pop, SC has been a little hit-or-miss for me in the past, but these two oranges worked out quite nicely.


Orly's Lucky Duck
CG's Red Pearl
Sinful Colors' Cloud 9  (orange)
Sinful Colors' Let's Meet  (light orange)
Essie's Shine of the Times


Sunday, April 1, 2012

Week 24 - Kawaii Nails

Sinful Colors' Boom Boom
Sinful Colors' Pinky Glitter

Okay, if you google image search "kawaii nails" the results you get are down right terrifying. So, for lack of oversized 3D bows/cupcakes/disembodied-hello-kitty-heads, I went with rhinestone french tips.


Wednesday, March 14, 2012

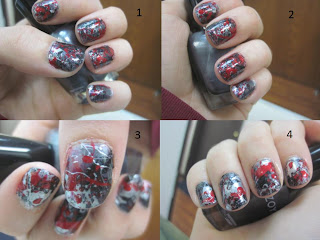
Week 16 - Splatter Nails (January 16, 2012)

1 & 2 is my left hand
3 & 4 is my right hand
Zoya's FrejaCG's Red PearlCG's Platinum SilverSC's Secret Admirer
This was a lot of fun but super messy! I got so many compliments when I wore this with a cute, dark grey sweater-dress. At least three people said my nails reminded them of Jackson Pollock!  

There are a couple of ways to do splatter nails, and  I chose the straw technique. Messy, but in my opinion, the most effective and cool looking! Clean-up was a major pain as there was polish everywhere, and not flooding your cuticles is pretty impossible with this technique, so go hog .

I did two coats of Freja, a gorgeous shimmery steel-grey, as the base color. For the splatter, I took three straws - one for each color - and dipped it a good half-inch into the polish well (you kind of have to guesstimate since you can rarely see into the bottle from the sides). Then you lift it out, letting any super-excess drip off, position it over your nail, and puff hard through the straw! It can be hit or miss sometimes. The main thing you want to avoid is just globbing a drop on your nail instead of splattering. Short, quick, hard puffs through the straw are the best way to go. And if you still end up globbing here and there, just roll with it. :) It'll all get smoothed out with the top coat, and no matter the outcome, it's art!


Week 12 - Christmas (December 19, 2011)

Too many colors to name them all.

This one was pretty cute to wear! Lots of colors, lots of fun. Also first time using Orly's Sweet Peacock (pinky) and Fowl Play (ornaments, ring finger), which I got from a swap.

All went well, except the green I used on my middle finger ended up staining my nail yellow. :[ It was also really really thin and would smudge/wrinkle if you even looked at it wrong. I lost count of how many times I had to completely redo it. That green turned me of off Sinful Colors for awhile, but I've since learned that any green, regardless of brand, will stain my nails in spite of a base coat present.Will post the name when I get home and can look it up.

Week 11 - Violet (December 12, 2011)

Inspiration: My Little Pony's Twilight Sparkle! ♥♥
CG's Coconut Kiss
SC's Bali MistOrly's Elsbeth's RoseCG's Platinum Silver

I've been waiting soo long to do a MLP-inspired manicure, and this week's Violet theme provided the perfect excuse.


I did two coats of Coconut Kiss on each finger. Then I did a centered taping of Bali Mist, which is really sheer on its own and looks lovely over the dark purple. I then applied two coats of Bali Mist over my ring finger and free-handed the cutie mark with a brush and Elsbeth's Rose. I then used a striping tool for the Platinum Silver on each finger. 


Ponies are so boss.

Tuesday, March 13, 2012

Week 10 - Winter (December 5, 2011)

Winter makes me think of how it gets dark early in the evening, so for Week 10's theme I went for a clear, dark, night sky.


Dark blue - Essie's Aruba Blue
Sparkle blue star trails - China Glaze Dorothy Who?
Black - Sinful Colors Secret Admirer + 1 coat of China Glaze Fairy Dust
Dorothy Who? is a lovely blue glitter that I used for the star tails (just free-handed it with the polish brush). The stars themselves are stickers, and only the thumb and ring finger got rhinestone ones. The accent finger is Secret Admirer, a really pretty black polish loaded with silver micro glitter. To emphasize the fully starry night effect, I added a coat of CG's Fairy Dust, a super dense holo-micro glitter polish in a clear base.

Sorry for the blurriness. I took this on my cell phone at the time. It then got slightly corrupted uploading to Facebook and then being re-saved to my desktop a few months later.